Handling Macintosh game files
This section explains how to access game data files from Macintosh media. For general information on how ScummVM handles game data files, including which files are required to play a game, see Handling game files.
Background
There are three main aspects of Macintosh floppy or CD media that can make it difficult to extract the game data: the file system, forks, and file name encoding.
HFS and HFS+ file system
The Macintosh uses a different file system to other operating systems; HFS for older media, and HFS+ for more recent ones.
HFS (Hierarchical File System), also known as Mac OS Standard, was used on Macintosh hard disk, floppy disks, and CDs until the late 90s. It was superseded by HFS+, or Mac OS Extended, with the release of Mac OS 8.1 in 1998. Most game CDs released before the mid-2000 still use HFS. Modern macOS computers can still access HFS+ media, but support for reading HFS media was dropped in macOS 10.15 (Catalina).
To view and copy the files from HFS and HFS+ floppy disks and CDs on a Windows or Linux system, you need to install additional software.
Most, if not all, Macintosh games supported by ScummVM were released on an HFS medium, but if you do have a HFS+ CD then check out the Other methods section for ways to access these files. ScummVM’s Python-based dumper also supports the HFS+ format if you are using it on macOS.
Forks
Macintosh HFS and HFS+ media have a concept called forks. For those familiar with NTFS, it’s the same principle as NTFS streams. A file can consist of two forks, a data fork and a resource fork. Both are important for games to work correctly. Systems other than macOS do not support resource forks, and a regular file copy from a HFS or HFS+ media on such a system will only copy the data fork. To properly preserve the resource fork during the copy, those files need to be converted to a MacBinary file.
File name encoding
Filenames in Japanese games are encoded in a way that is unique to Apple. The result is that a Mac copy of a game will not always show the correct filenames.
Macintosh also allowed special characters to be used that are disallowed in filenames on other platforms.
ScummVM runs on a wide variety of platforms and not all those platforms can store Japanese filenames or other special characters, such as non-ascii characters. ScummVM uses punycode to handle file names that would otherwise not be supported. Punycode converts all non-ascii characters to a special format. If the original file name had special characters, the new file name will start with xn--,for example, xn--Icon-ja6e.
Files that contain prohibited characters are always puny-encoded.
Note
Windows, MacOS and Linux can store these files and do not need punycode enabled.
For more information, see the Windows naming conventions for a list of prohibited characters.
How to extract Macintosh game files
The simplest way to extract the correct game files is to use the dumper companion created and supplied by ScummVM. The dumper can extract files from an HFS medium, encode files to the MacBinary format, and rename files with Punycode if needed.
There are two versions of the dumper: a disk/ISO image version that runs in a browser, and a full-fledged version which uses Python. The browser-based version is the preferred method since this will work in the majority of cases, and it is less hassle because there is nothing to install.
The first step is to create an ISO image of your floppy or CD medium.
Creating the ISO image
Note
If you are accessing HFS+ media in macOS, or HFS media on a macOS 10.14 Mojave system or older, this step is not required when using the Python dumper in MAC mode.
Use an application such as IsoBuster to create an ISO image of the CD.
Use the following commands in the Terminal to find the identifier of the media, and then create an ISO image of that media.
List disks to get the identifier for the CD or floppy disk partition: .. code-block:
diskutil list
Alternatively, find this information using the Disk Utility application. Select the CD partition and look at the name under the device section.
Unmount the disk if needed: - By default disks are mounted when they are inserted, and they need to be unmounted so that you can create the ISO file. - HFS is no longer supported on macOS 10.15 and above, therefore those disk cannot be mounted and do not need to be unmounted.
sudo umount /dev/diskID
Create the iso image: .. code-block:
sudo dd if=/dev/diskID of=/path/name.iso
Eject the CD: .. code-block:
drutil tray eject
Example
In the example below the CD is the last disk listed as CD_partition_scheme, and the identifier for the HFS partition is disk5s1s2.
iMac:~ ego$ diskutil list
/dev/disk0 (internal, physical):
   #:                       TYPE NAME                    SIZE       IDENTIFIER
   0:      GUID_partition_scheme                        *121.3 GB   disk0
   1:                        EFI EFI                     209.7 MB   disk0s1
   2:                 Apple_APFS Container disk4         121.1 GB   disk0s2

/dev/disk1 (internal, physical):
   #:                       TYPE NAME                    SIZE       IDENTIFIER
   0:      GUID_partition_scheme                        *3.0 TB     disk1
   1:                        EFI EFI                     209.7 MB   disk1s1
   2:                 Apple_APFS Container disk4         3.0 TB     disk1s2

/dev/disk2 (synthesized):
   #:                       TYPE NAME                    SIZE       IDENTIFIER
   0:      APFS Container Scheme -                      +3.1 TB     disk2
                                Physical Stores disk0s2, disk1s2
   1:                APFS Volume Macintosh HD            1.8 TB     disk2s1
   2:                APFS Volume Preboot                 42.2 MB    disk2s2
   3:                APFS Volume Recovery                510.6 MB   disk2s3
   4:                APFS Volume VM                      20.5 KB    disk2s4

/dev/disk3 (external, physical):
   #:                       TYPE NAME                    SIZE       IDENTIFIER
   0:        CD_partition_scheme                        *783.5 MB   disk3
   1:     Apple_partition_scheme                         682.2 MB   disk3s1
   2:        Apple_partition_map                         1.0 KB     disk3s1s1
   3:                  Apple_HFS disque 1                681.6 MB   disk5s1s2
iMac:~ ego$ sudo umount /dev/disk3s1s2
Password:
iMac:~ ego$ sudo dd if=/dev/disk3s1s2 of=/Users/ego/BS1-fr.iso
1331200+0 records in
1331200+0 records out
681574400 bytes transferred in 396.380454 secs (1719495 bytes/sec)
iMac:~ ego$ drutil tray eject
Use the following commands to create an ISO image from an inserted HFS or HFS+ medium.
sudo dd if=/dev/cdrom of=/path/name.iso
Usually the device will be /dev/cdrom, /dev/dvd, or /dev/floppy. Alternatively, use sudo blkid to list the mounted and unmounted devices with their ID.
Example
~$ sudo blkid
/dev/sr0: PTTYPE="mac"
~$ sudo dd if=/dev/sr0 of=/home/ego/BS1-fr.iso
1332420+0 records in
1332420+0 records out
682199040 bytes (682 MB, 651 MiB) copied, 421.918 s, 1.6 MB/s
Using the browser dumper companion - preferred method
The browser based dumper companion supports reading HFS media as ISO and disk images. It generates a ZIP file that can be extracted and then imported in ScummVM.
Upload the disk/ISO image file
Select the options:
Choose Japanese when dumping Japanese disks
Deselect unicode if the platform does not support it
Click the dump button
Download the ZIP file
Extract the ZIP file
Add the extracted directory to scummvm
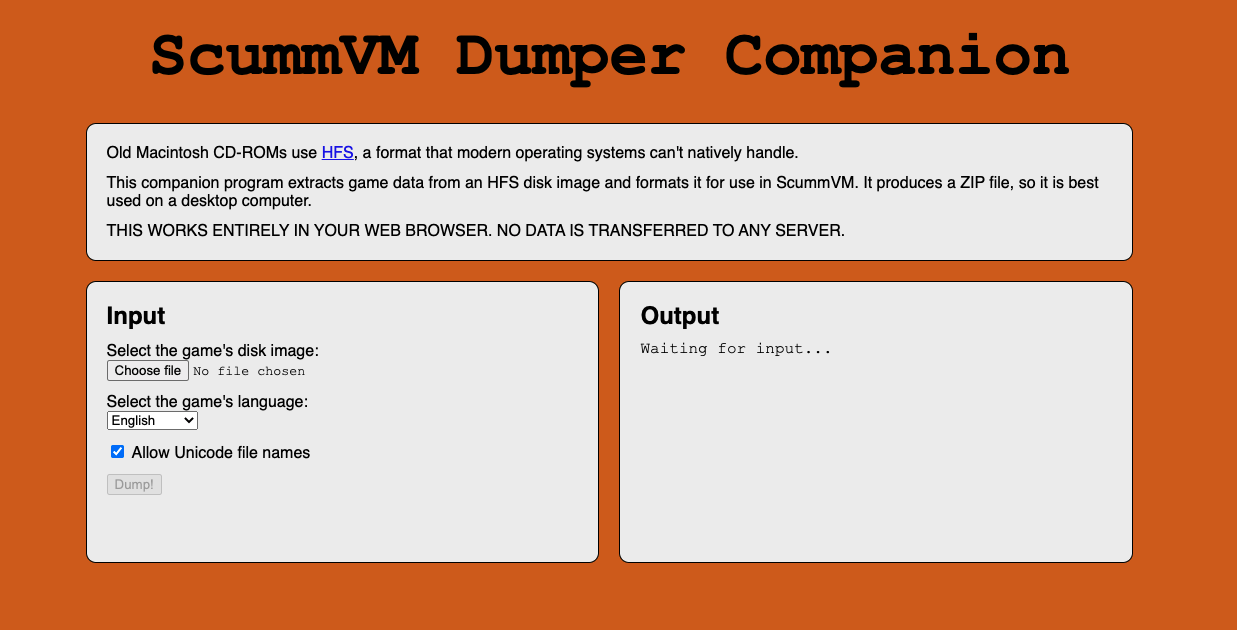
The browser based dumper companion.
Note
This web dumper-companion works entirely in your web browser and does not transfer the data to any servers.
Using the Python dumper companion
The Python dumper companion supports HFS disks, unless you are running it on a Mac, in which case MAC mode also supports HFS+.
Prerequisites
Python3 with pip installed. Information on how to install Python can be found here.
The dumper file downloaded from the repository.
Installation
Install machfs, and xattr if using macOS:
pip3 install machfs xattr
pip3 install machfs
Use
The dumper companion supports three modes: ISO, DIR and MAC. The MAC mode is specific to macOS. There’s also a STR mode that is used test drive the punyencode parts. For more info see its help section.
Note
The dumper companion also has help text:
./dumper-companion.py --help
ISO mode
This mode will dump an HFS ISO file to the OUTPUT directory. This directory can then be added to scummvm.
dumper-companion.py iso [-h] [--punycode] [--japanese] INPUT OUTPUT
Options:
--punycode: encodes all filename characters as punycode. Select this when your platform doesn’t support UTF-8 filenames--japanese: Use this when dumping Japanese disks.
DIR mode
This mode will puny-encode all files and directories in the current directory.
dumper-companion.py dir [-h] directory
MAC mode
This mode is specific to macOS. It will traverse a directory, find all the resource forks and combine them in a MacBinary file. It is useful for when you already have all game files on your harddrive and want to import them into ScummVM.
dumper-companion.py mac [-h] [--punycode] directory
Options:
--punyencode: encodes all filename characters as punycode, select this when your platform doesn’t support UTF-8 filenames
Note
On macOS ScummVM directly accesses data and resource forks, however converting to MacBinary can be useful if you plan to transfer those files to a different system.
Other methods
There are other ways to access HFS and HFS+ media on Windows, macOS, and Linux. These methods require you to copy the files manually.
For Windows, HFS Explorer is a basic and free option, which gives you read-only access to both HFS and HFS+ drives. Use the installer rather than the zip file, to ensure it is installed correctly. For files with a resource fork you will need to use the option to extract as MacBinary. Extract files that only have a data fork as a “raw copy, data fork”.
Alternatively, HFVExplorer can also be used for HFS drives. There is no option to extract as MacBinary, but you can extract files with a resource fork as AppleDouble using the “extract data and resource fork(s)” option.
On macOS you can read HFS+ volumes, and in some cases HFS volumes, and copy the files in the usual way in the Finder. Some discs shipped with hidden files that need to be copied. To view hidden files in macOS, press Cmd+Shift+. in a Finder window.
There is also no need to convert files with a resource fork into MacBinary files, but if you want to do it, for example to later transfer the files onto a different system, you can use the macbinary command line tool.
macbinary encode -o <outfile> <infile>
However the dumper companion is recommended in some cases:
If you have a newer operating system. HFS media can only be read on macOS 10.14 (Mojave) and older. Support for reading HFS volumes was removed in macOS 10.15 (Catalina).
If files contain invalid characters.
If you plan to transfer those files to a different system.
Access HFS+ drives using hfsplus. To use hfsplus, use the command line:
Install hfsplus using the software manager. On Debian-based distributions, use
sudo apt install hfsplus.Find the game disc by running
sudo fdisk -land finding the one with typeApple HFS/HFS+. In this example, this is/dev/fd0.Create a mount point, for example:
sudo mkdir /media/macgamedriveMount the device to that moint point:
sudo mount -t hfsplus /dev/fd0 /media/macgamedriveAccess the device at
/media/macgamedrive. To copy files you can usehpcopy. It takes options to indicate if the files should be converted to macbinary (-m) or copied as a raw file (-r).
Access HFS drives using hfsutils. To use hfsutils, use the command line:
Install hfsutils using the software manager. On Debian-based distributions, use
sudo apt install hfsutils.Find the game disc by running
sudo fdisk -land finding the one with typeApple HFS/HFS+. In this example, this is/dev/fd0.Mount the HFS volume by running
hmount /dev/fd0List the files and directories on the HFS media using
hls, change the working directory on the HFS media usinghcdand copy files usinghcopy. Thehcopycommands take options to indicate if the files should be converted to macbinary (-m) or copied as a raw file (-r). For examplehcopy -m "PP Disk 1:PP Data:JMP PP Resources" "pegasus/JMP PP Resources".Unmount the HFS media with
humount /dev/fd0