iOS
This page contains all the information you need to get ScummVM up and running on an iOS device.
Installing ScummVM
There are two ways to install ScummVM on an iOS device, and the method you use depends on whether or not the device has custom firmware installed.
Devices without custom firmware
To installing ScummVM on an iOS device without custom firmware you need to build the app from the source code, and then install it on your device. While a basic knowledge of the command line would be useful, the following instructions, if followed carefully, can be completed by anyone.
What you’ll need
A Mac computer with Xcode installed. Xcode is a free App, available from the Mac App Store.
An Apple Developer account. You can sign up for a free account on the Apple Developer Member Center with your Apple ID.
The ScummVM iOS Libraries downloaded, and the zip file extracted.
Note
If you have a free Apple developer account, each build will only be valid for 7 days, which means you will need to repeat these steps and rebuild ScummVM every week.
Step 1: Setting up the Xcode project
The first step is to download the repository containing the code required to build the app. The next steps require use of the command line. Go to Applications > Utilities > Terminal and copy and paste the following, then press return. This downloads (clones) the source code into your Home directory, into a folder called scummvm:
git clone --depth 1 -b branch-2-6 https://github.com/scummvm/scummvm.git
Tip
To view the Home directory in the Finder, select Go > Home in the menu bar, or press command+shift+H.
If you haven’t done so before now, open Xcode from the Applications folder, and accept the End User License Agreement. Starting Xcode for the first time also installs the command line tools required.
Create a new directory called build at the same level as the repository you just cloned, using either the Finder, or the command line as follows:
mkdir build
Copy the contents of the scummvm-ios7-libs-v2 folder you extracted earlier into the build directory, using either the Finder, or the command line as follows:
cp -r ~/Downloads/scummvm-ios7-libs-v2/* ~/build/
If your downloaded iOS library folder is not in the Downloads folder as it is in the preceding example, change the path to where the folder actually is.
Now let’s change the present working directory and then set up the tools required to create the Xcode project:
cd scummvm/devtools/create_project/xcode
xcodebuild
Step 2: Generating the Xcode project
Change your present working directory to the build directory:
cd ~/build
It’s time to generate the Xcode project. Run the following on the command line:
../scummvm/devtools/create_project/xcode/build/Release/create_project ../scummvm --xcode --enable-fluidsynth --disable-nasm --disable-opengl --disable-theoradec --disable-mpeg2 --disable-taskbar --disable-tts --disable-fribidi
The resulting directory structure looks like this:
Home
 |--scummvm
 '--build
     |-- include
     |-- lib
     |-- engines
     '-- scummvm.xcodeproj
Open the scummvm.xcodeproj file from the Finder, or from the command line:
open scummvm.xcodeproj
Step 3: Building the ScummVM app
When Xcode is open, connect a device to install ScummVM onto. At the top of the window, select ScummVM-iOS and then select the device you just connected. You will need to “Trust” the device for it to show up on the list of connected devices.
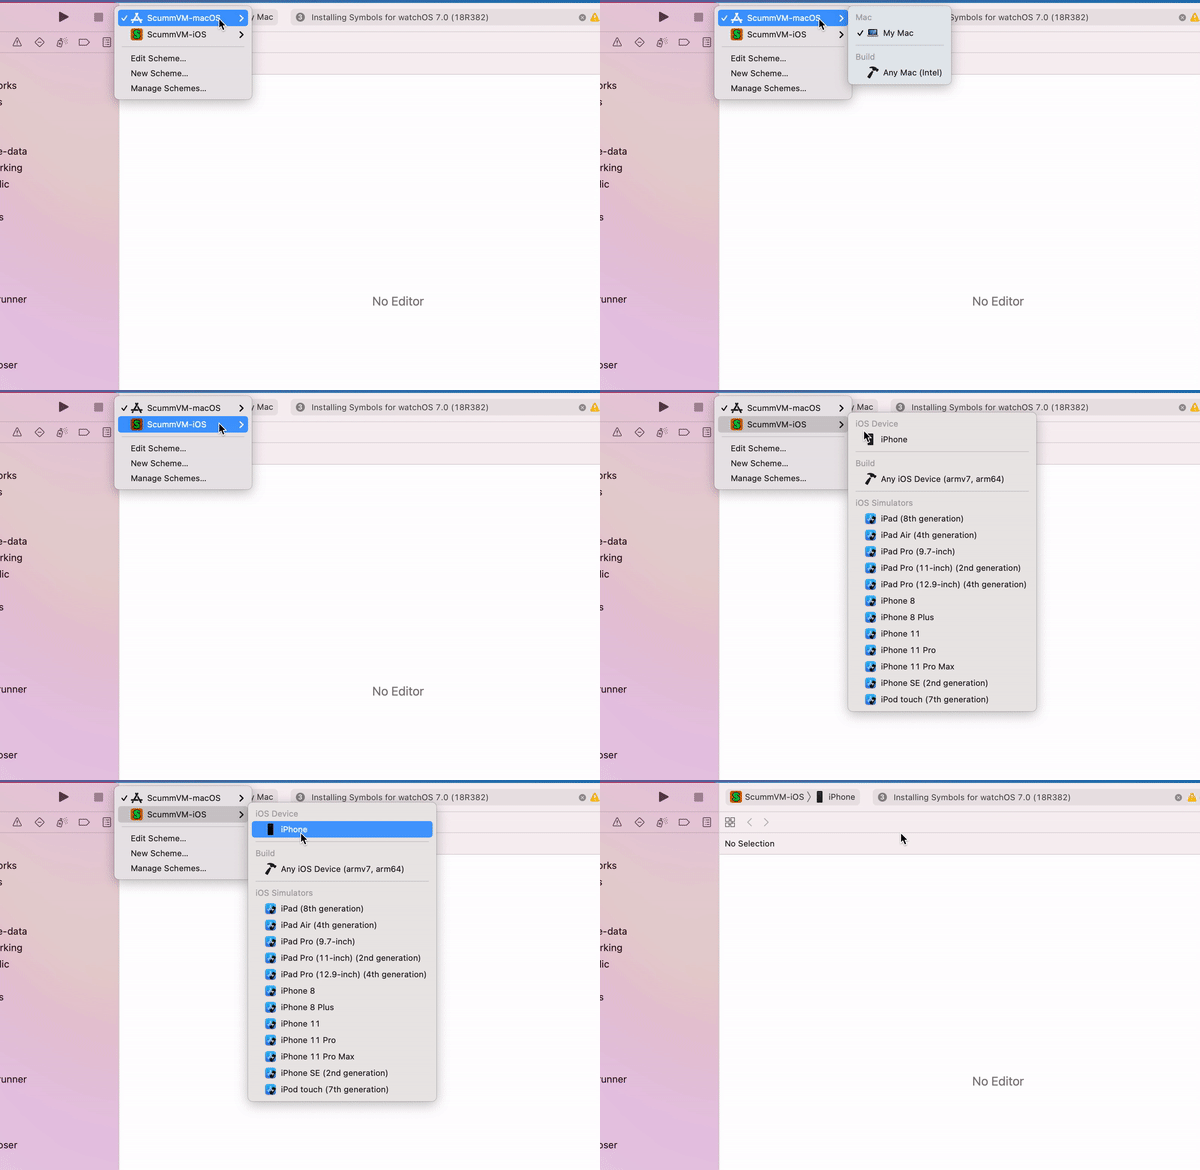
You may need to disable bitcode generation in the build settings. This should already be disabled by default when you make a build specifically for your device, but it is enabled by default when you build for a ‘’Generic iOS Device’’.
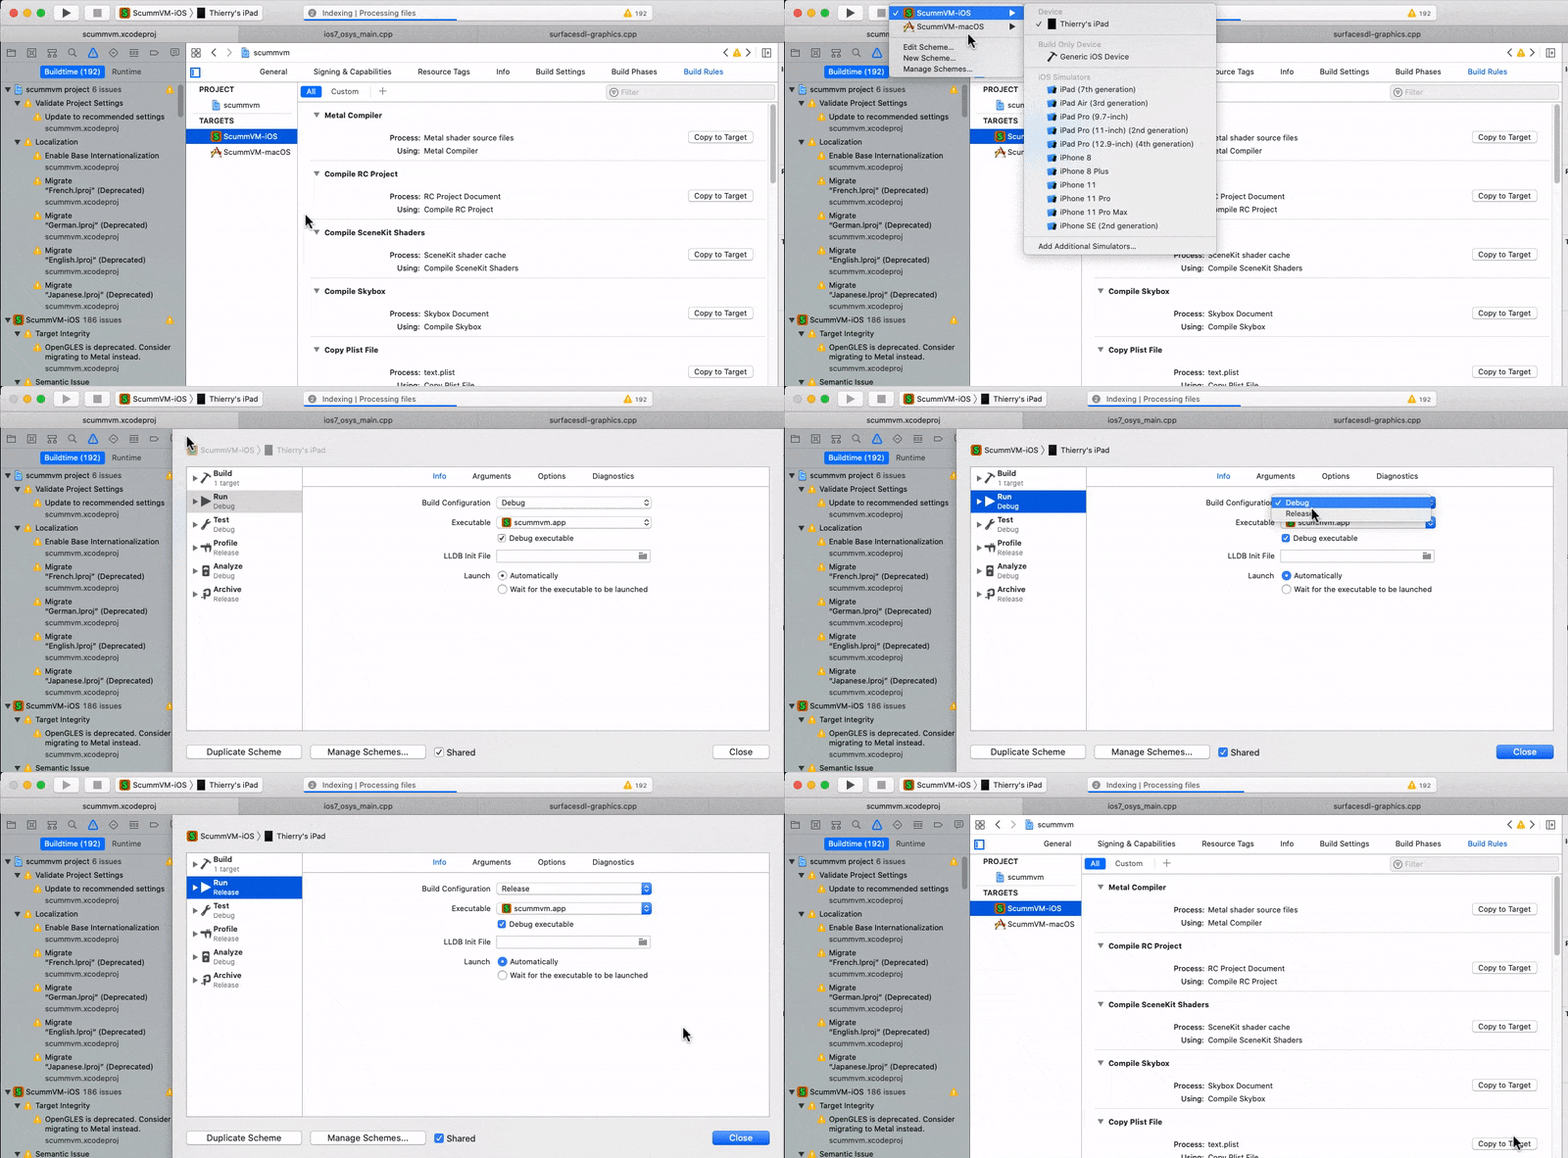
Unless you want to debug issues with ScummVM on iOS, you probably want to compile ScummVM in release mode to get better performances when playing games.
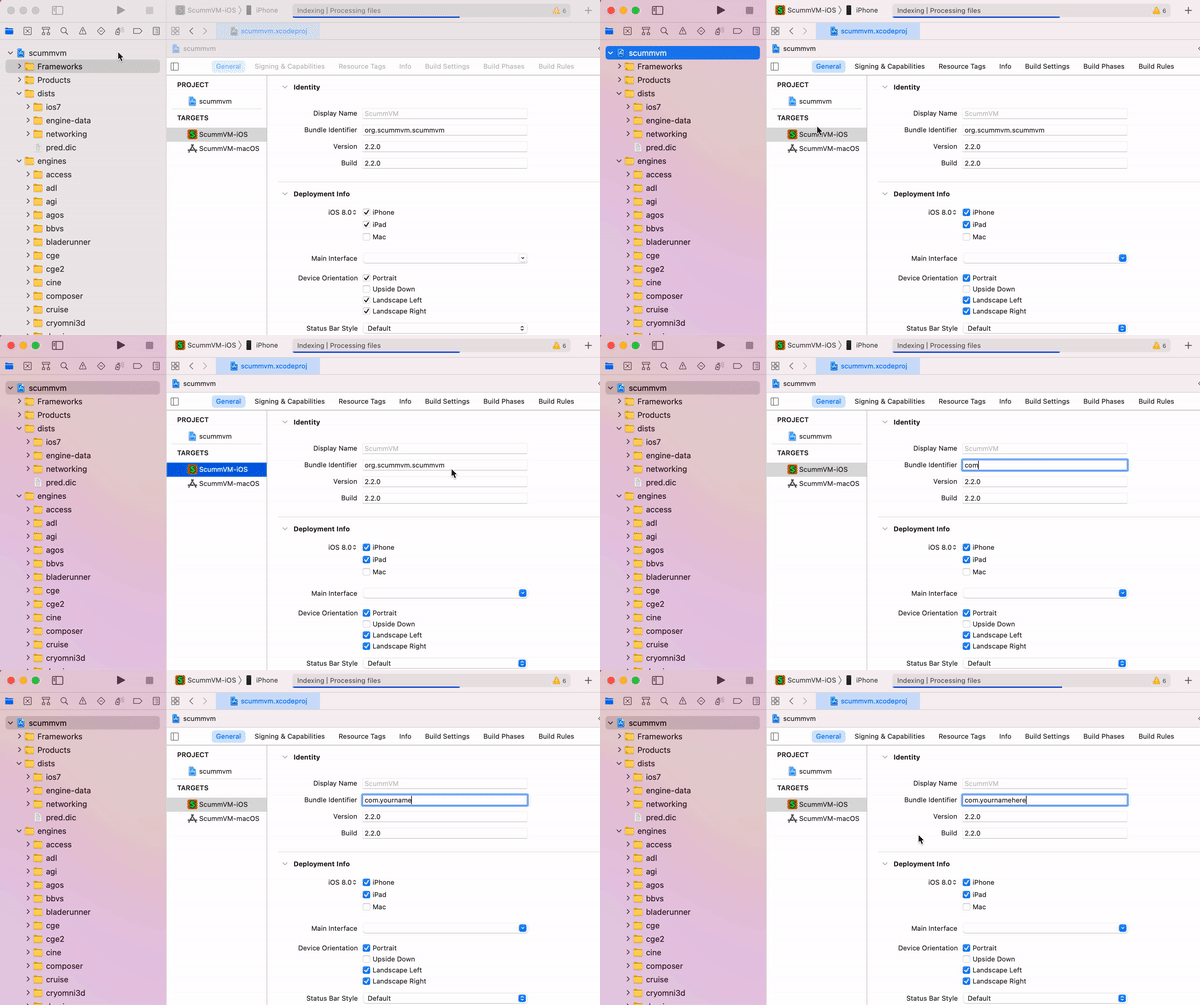
The last step before building ScummVM is to change the bundle identifier and manage signing. Click on the scummvm project in the left pane, and then click on ScummVM - iOS under TARGETS. On the menu bar above, click on General. Under Identity there is a field labeled Bundle Identifier. Enter a unique identifier in reverse-DNS format. This can be as simple as com.yournamehere.
Next to General, click on Signing & Capabilities. Under Signing, tick the Automatically manage signing box, and select your developer account from the Team dropdown menu.
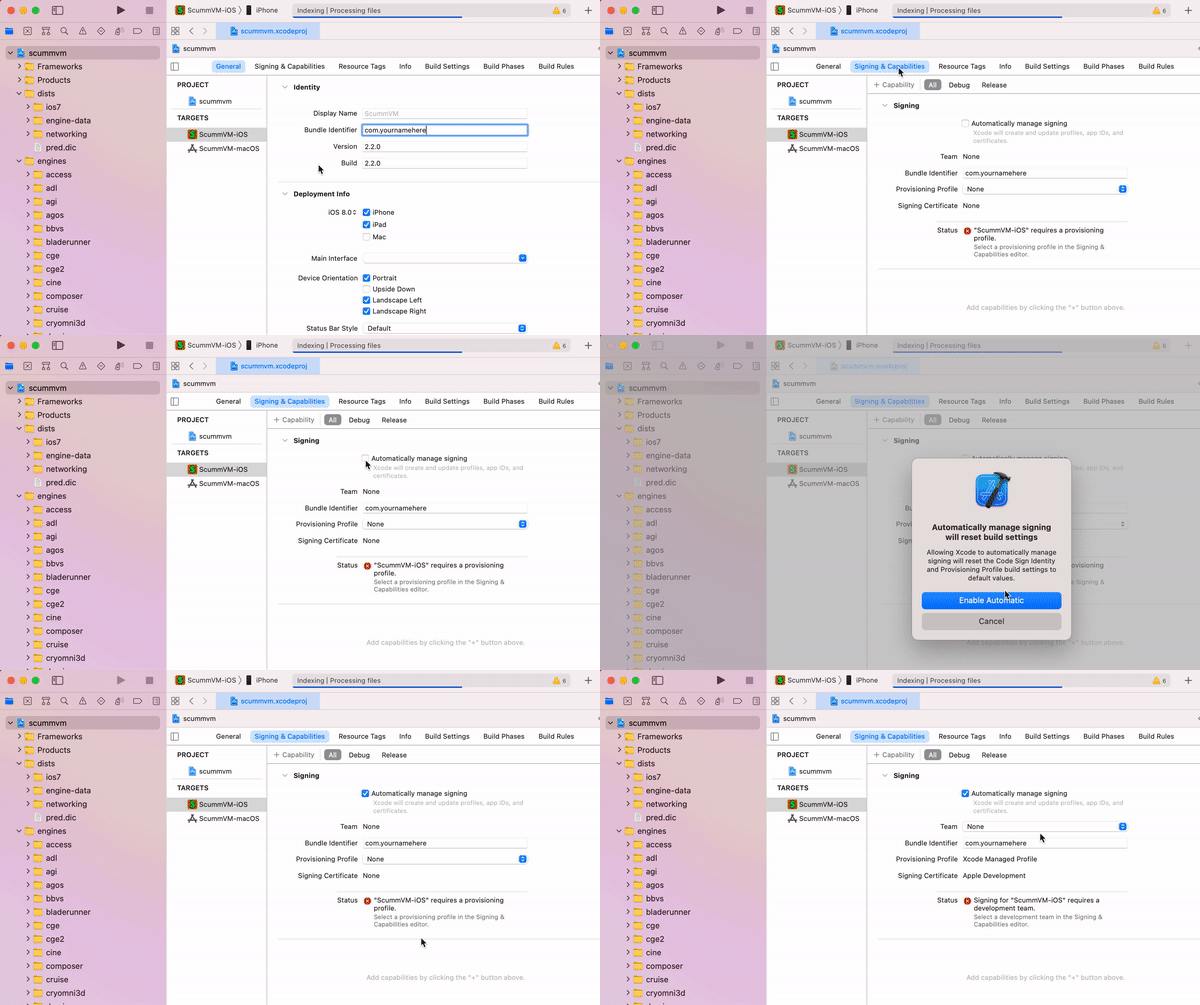
If you have not added your developer account to Xcode, do this now. Click Add an Account in the dropdown menu.
In the upper left-hand corner, press the play button to build ScummVM. When the build is finished, it launches on your connected device.
If ScummVM does not launch and you get an error message advising that the app failed to launch due to an invalid code signature, inadequate entitlements or because its profile has not been explicitly trusted by the user, you need to trust the apps that you have built. On your iOS device, go to Settings > General > Device Management > Developer App > Trust “Apple Development:yourAppleIDhere” > Trust.
Devices with custom firmware
What you’ll need
An iOS device with custom firmware installed (jailbroken). How to jailbreak a device is outside the scope of this documentation.
A file manager app such as Filza installed on the device.
Downloading and installing ScummVM
Go to the ScummVM downloads page and download the recommended .deb or .ipa package. When the device asks how to open the file, choose Filza.
Ensure the package is saved somewhere in the /var/mobile/ directory. It defaults to /var/mobile/Documents/, which is fine. Tap on the file and then tap Install in the upper right corner to install ScummVM.
Restart your device for the install to complete.
Transferring game files
There are multiple ways to transfer game files to your iOS device.
ScummVM has built-in cloud functionality, which lets you connect your Google Drive, OneDrive, Box or Dropbox account. For more information, see the Connecting a cloud service page. ScummVM also has the ability to run a local web server. For more information, see the Using the local web server page.
Note
ScummVM’s cloud functionality does not currently support iCloud, however you can upload game folders to your iCloud and then use the Files app on your iOS device to copy these folders into the local ScummVM folder.
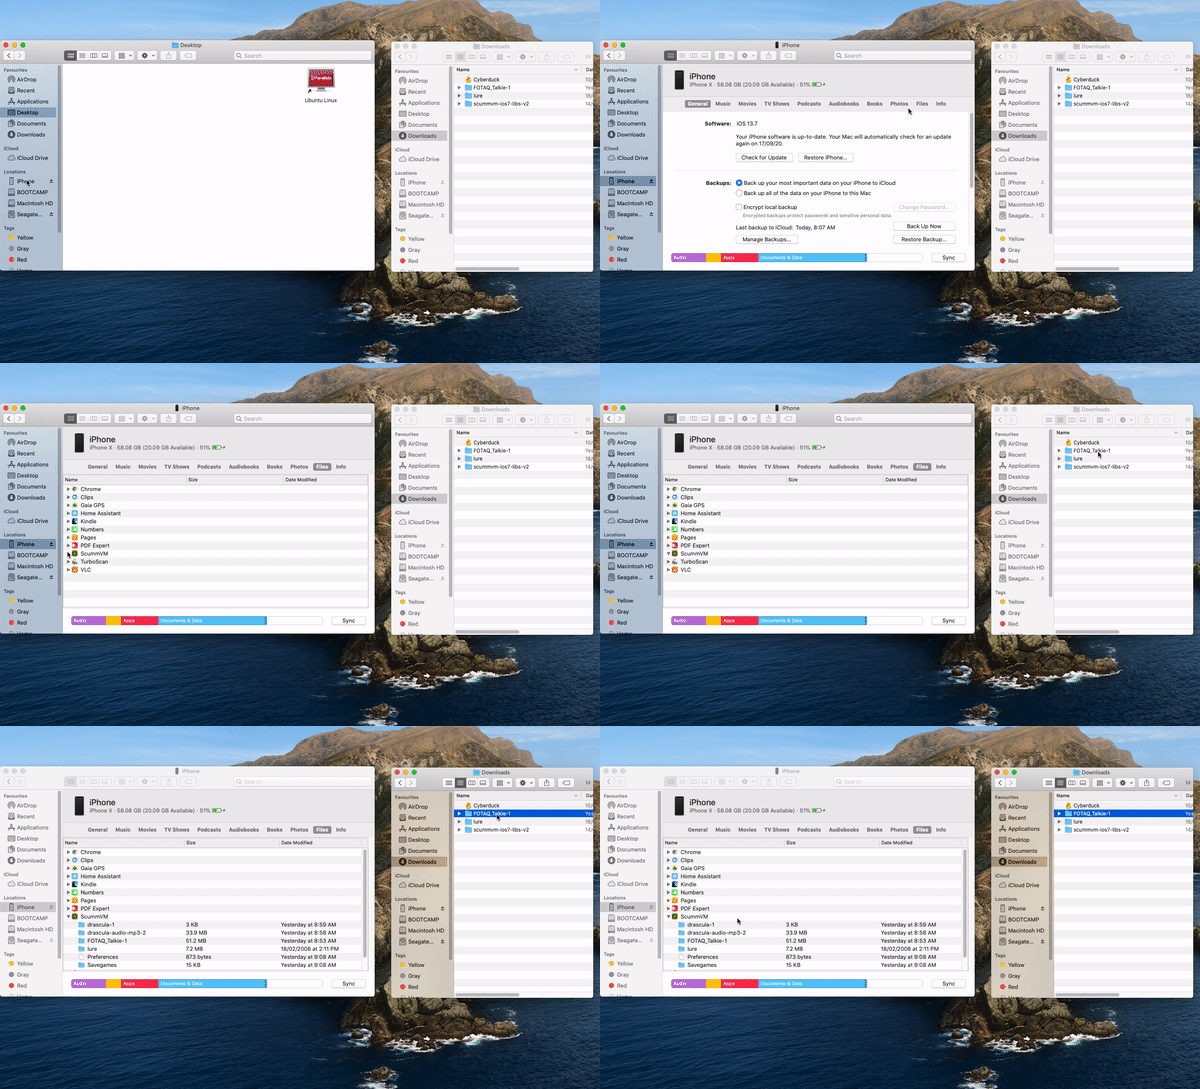
Another way to transfer files (for macOS Catalina and newer) to your device is by using the Finder while your device is connected to your Mac. In the Finder app on your Mac, navigate to Locations in the left pane, and click on the connected device. Click on Files, then drag the folder containing the game files into the ScummVM folder. For older versions of macOS, and for Windows users, file transfer can be done in iTunes.
See Handling game files for more information about game file requirements.
Controls
Touch screen control |
Action |
|---|---|
One finger tap |
Left mouse click |
Right mouse click |
|
ESC |
|
Two finger swipe (bottom to top) |
Toggles Click and drag mode |
Two finger swipe (left to right) |
Toggles between touch direct mode and touchpad mode. |
Two finger swipe (top to bottom) |
Global Main Menu |
Three finger swipe |
Arrow keys |
Pinch gesture |
Enables/disables keyboard |
Keyboard spacebar |
Pause |
Touch controls
The touch control scheme can be switched in the global settings. From the Launcher, go to Options > Control > Touchpad mouse mode.
When touchpad mouse mode is off, the touch controls are direct. The pointer jumps to where the finger touches the screen.
When touchpad mouse mode is on, the touch controls are indirect. The finger can be far away from the pointer and still move it, like on a laptop touchpad.
The pointer speed setting in the Controls tab affects how far the pointer moves in response to a finger movement.
Two finger tap
For a two finger tap, hold one finger down and then tap with a second finger.
Two finger double tap
For a two finger double tap, hold one finger down and then double tap with a second finger.
Click and drag mode
Simulates a left mouse click when you touch the screen. The mouse pointer drags to wherever you slide your finger, and releases where you lift your finger.
If you press down a second finger in this mode, it releases the simulated left mouse button, and presses down the simulated right mouse button. The right mouse button is released when you lift your finger again.
Keyboard
If no external keyboard is connected, the pinch gesture shows and hides the onscreen keyboard. When an external keyboard is connected, the pinch gesture enables/disables inputs from the external keyboard.
Paths
Saved games
/var/mobile/Library/ScummVM/Savegames/ if the device is jailbroken, or Savegames/ in the ScummVM folder for a non-jailbroken device. Access this folder through the Finder or iTunes.
Configuration file
/var/mobile/Library/ScummVM/Preferences if the device is jailbroken, or Preferences in the ScummVM folder for a non-jailbroken device. Access this folder through the Finder or iTunes.